

We all should write Unit Tests if we want our code to work and keep working.
Why you should do Unit Tests
You are planning to build an app. You start collecting features and drawing some sketches. At some point, you start coding. After you have set up the project, you start implementing the required features of the app, but you ended up with tons of bugs instead of features.
You rushed up and started to add breakpoints and waited for a miracle to happen and fix all of the bugs for you. Then, after thousands of reruns, you wished for some black magic to test your app and fix what you have committed.
What are Unit Tests
Automatic unit tests are the black magic you wished for. They execute code, but without the need to add breakpoints and navigate to the screen to test. Instead of running the app over and over again, you write tests with different input data and let the computer test your code in the blink of an eye. We will see how this works in a simple example.
What you should test?
The first thing to know before writing tests is you should know what you need to test.
Usually, you have to test new features, events, or components of the app you plan to change.
But in general, you will have to write tests for:
- The main functionality of the app
- The most common workflow
- Bug fixes
- Edge case and boundary conditions
Implementing a Unit Tests example
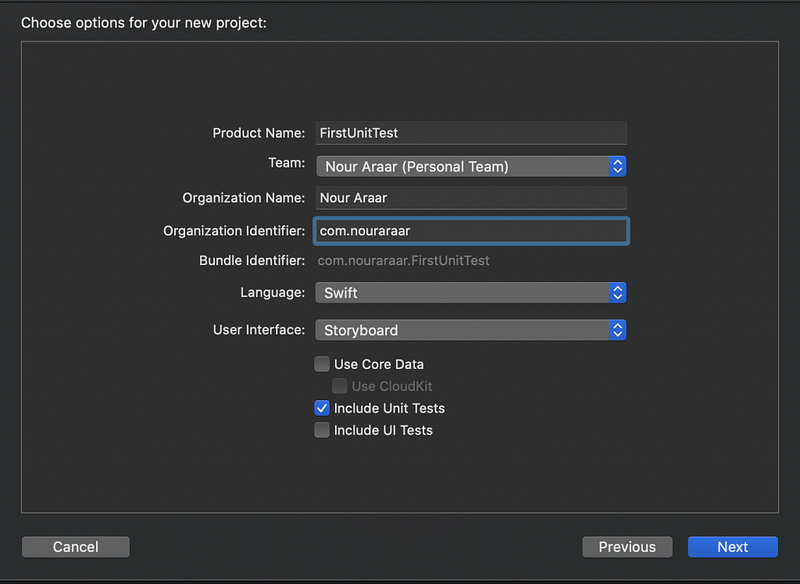
Open Xcode and go to File -> New -> Project. Navigate to iOS -> Application -> Single View App, and click on Next. Put in the name FirstUnitTest, select the language Swift, and check Include Unit Tests. Uncheck Use Core Data and Include UI Tests, and click on Next. The following screenshot shows the options in Xcode:
When done you will see this result in the Xcode navigator:

What is inside the FirstUnitTestTests?
If you opened the FirstUnitTestTests.swift file from Xcode Navigator you should see this at the top of the file:
import XCTest
@testable import FirstUnitTest
Every test case needs to import the XCTest framework. It defines the XCTestCase class and the test assertions that you will see later in this chapter.
The second line imports the module FirstUnitTest. All the code you write for the app will be in this module. By default, classes, structs, enums, and their methods are defined as internal. It means that they can be accessed within the module. While the test code lives outside of the module. To be able to write tests for your code, you need to import the module with the @testable keyword. This keyword makes the internal elements of the module accessible to the test case.
You will see four methods:
- setUpWithError: You should add your setup code here, this method is called before the invocation of each test method in the class.
- tearDownWithError: You should put the teardown code here. This method is called after the invocation of each test method in the class.
- testExample: This is an example of a functional test case. Every test case should have the test keyword at the beginning.
- testPerformanceExample: This is an example of a performance test case. You will add the code to test performance inside the self.measure closure.
In the beginning, it’s good practice to have a test case for each class in the main target.
Let’s write some code to test
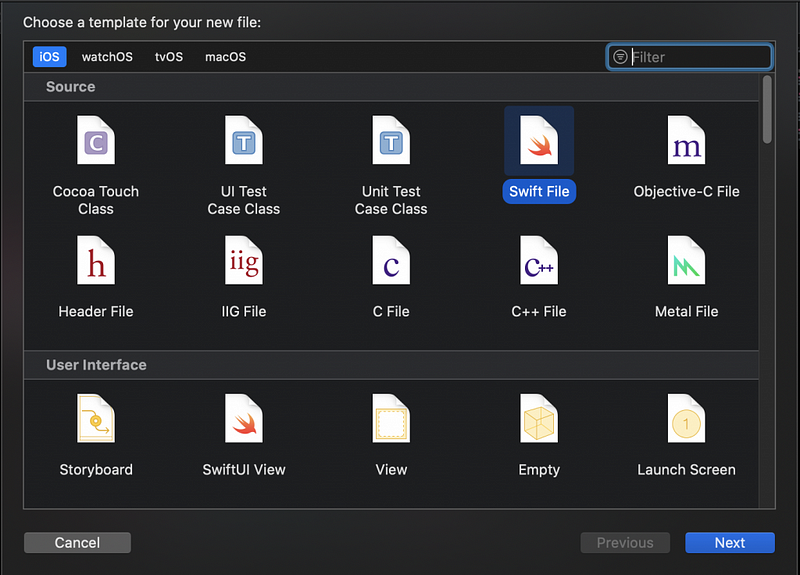
Let’s create our class to test it go to File -> New -> File
and select Swift File, name it Calculator.swift
Let’s write a couple of simple methods to test, they will be simple so we can focus on the purpose of this which is to see how to write tests.
Write down this code in the Calculator.swift file:
class Calcualtor {
    func sum(x: Int, y: Int) -> Int {
        return x + y
    }

    func multi(x: Int, y: Int) -> Int {
        return x * y
    }
}
Now let’s get our hands dirty.
Write your first Unit Tests
You can write the test function inside FirstUnitTestTest.swift or create a new test case class for the Calculator class. It is preferred to create a single test case class for every class.
In case you wanted to create a new test case class go to File -> New -> File -> Unit Test Case Class and give it the name CalculatorTest.swift.
You will find all the methods we talked about before but you will not see:
@testable import FirstUnitTest
Now add it to be able to use the Calculator.swift file.
In real-life testing, you can delete the previous four methods and start writing your own.
Write this simple method:
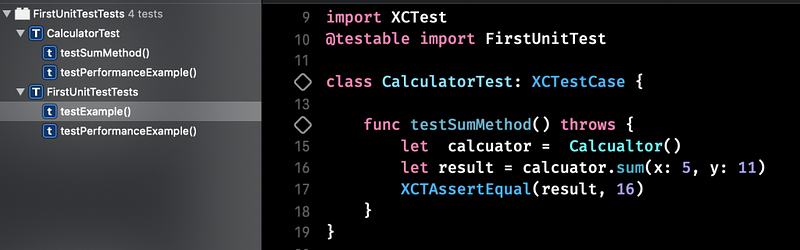
func testSumMethod() throws {
 let calcuator = Calcualtor()
 let result = calcuator.sum(x: 5, y: 11)
 XCTAssertEqual(result, 16)
 }
Run Your Unit Tests
You can run your unit tests from four different places:
- Product ▸ Test or Command-U. Both of these run all test classes.
- The arrow button in the Test navigator.
- The diamond button is in front of the test function.
- The diamond button in front of the class name will run all the test functions inside the class.
If everything is ok you should see something like this:
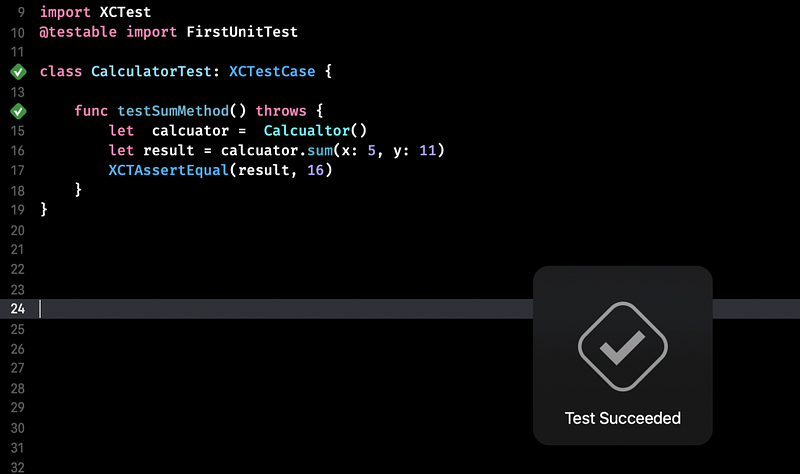
XCTAssertEqual is trying to test if two expressions are equal and throw an error if not.
How to Improve Unit Tests
There are some points to keep in mind while performing unit testing:
- Use consistent naming conventions and test one code at a time.
- Make sure that there is a corresponding unit test case for a module if there is any change in the code.
- All the bugs must be fixed before moving to the next phase.
- It’s better to test as you commit a code to avoid errors.
- Focus more on the tests that affect the behavior of the system.
Important built-in assert functions
The most important assert functions are:
- XCTAssertTrue(_:_:file:line:): This asserts that an expression is true.
- XCTAssertFalse(_:_:file:line:): This asserts that expression is false
- XCTAssertEqual(_:_:_:file:line:): This asserts that two expressions are equal
- XCTAssertEqualWithAccuracy(_:_:accuracy:_:file:line:): This asserts that two expressions are the same, taking into account the accuracy defined in the accuracy parameter
- XCTAssertNotEqual(_:_:_:file:line:): This asserts that two expressions are not equal
- XCTAssertNil(_:_:file:line:): This asserts that an expression is a nil
- XCTAssertNotNil(_:_:file:line:): This asserts that an expression is not nil
- XCTFail(_:file:line:): This always fails
Conclusion
It is clear that Unit Tests cannot and should not be avoided. Rather, developers should opt for Test-Driven Development where they write the test and then write the code. You just need to get suitable tools to further reduce your testing efforts.
If you like this article please clap and share it with friends.
If you want to have a discussion or reach me you can go to my website and get in touch